
Classroom Mode for Minecraft
Classroom Mode for Minecraft
Minecraft Education – Classroom Mode has management tools to enhance classroom use.
Why Classroom Mode for Minecraft
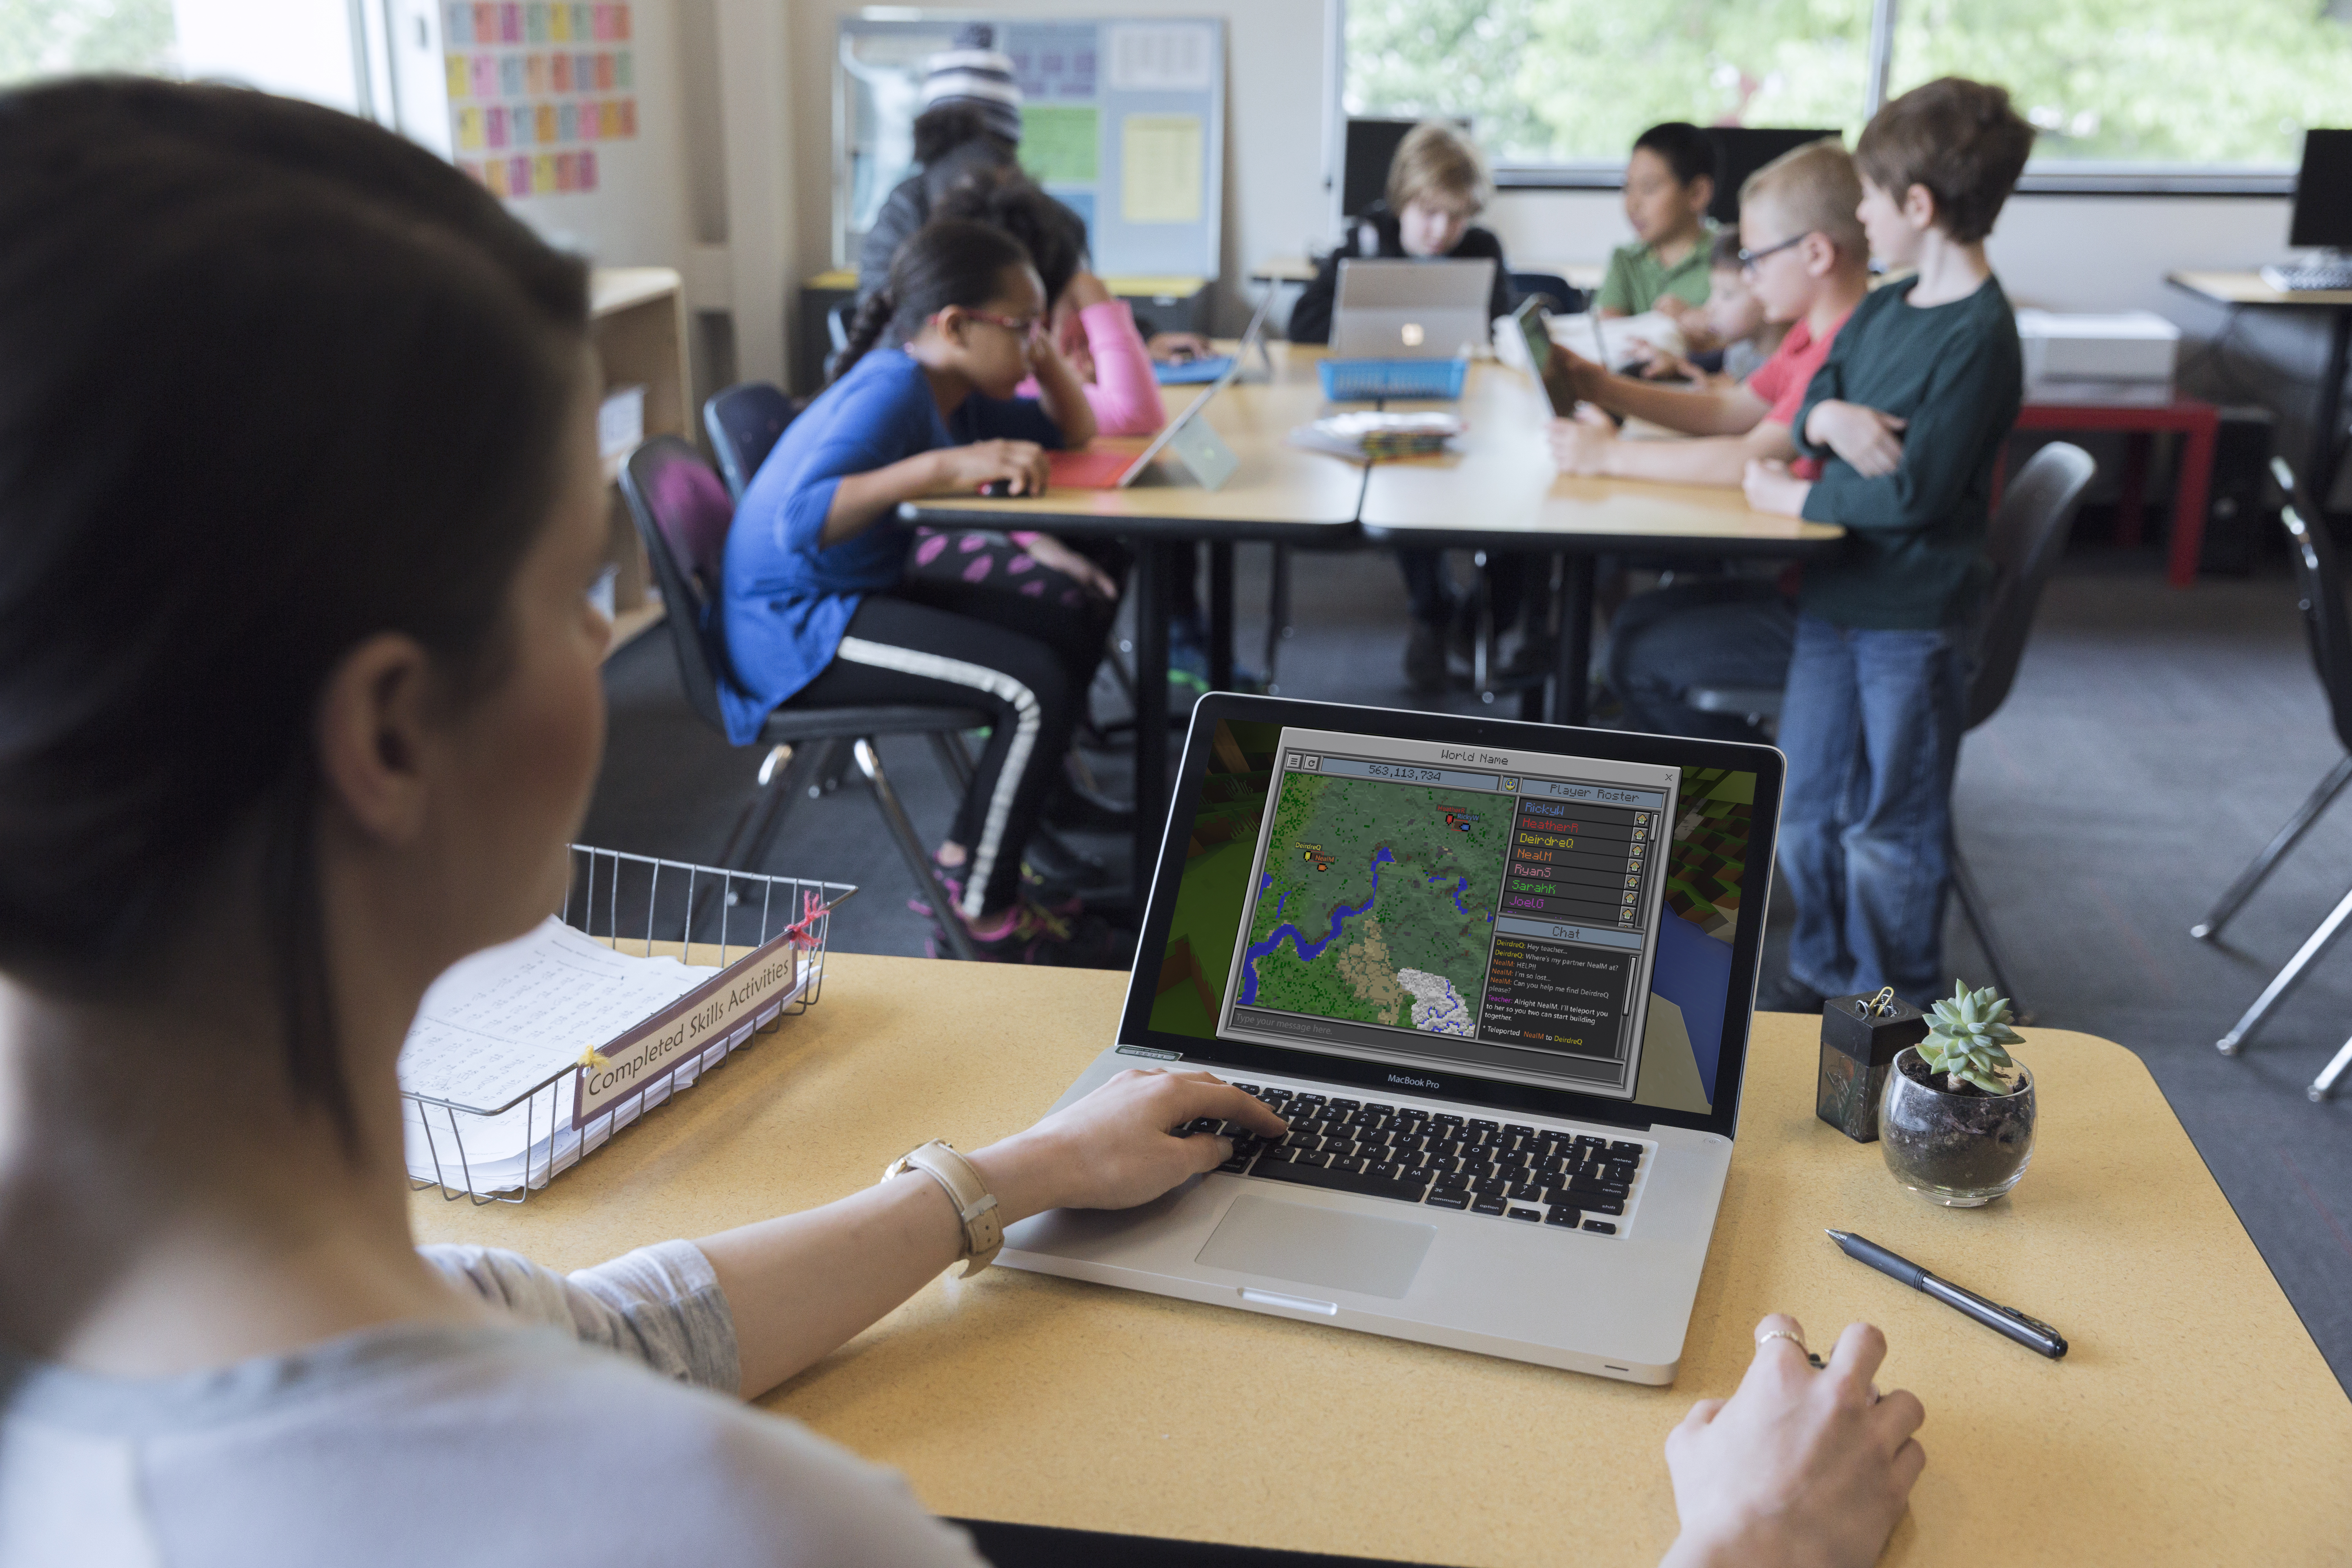
Classroom Mode for Minecraft is a companion application for Minecraft Education. Use it for added visibility and control of students when they join a world you host in Minecraft Education.
Classroom Mode allows you to:
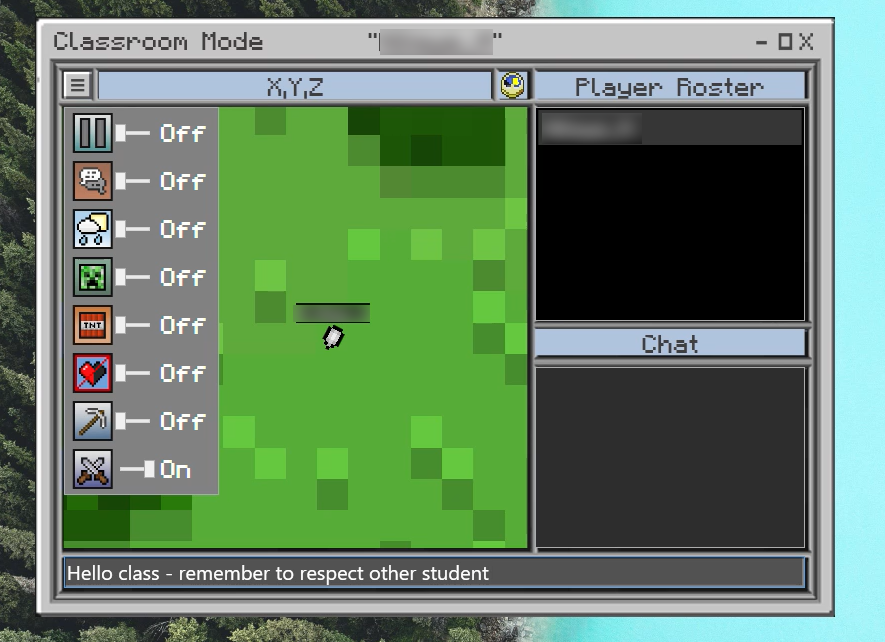
- control world settings
- see where all players are located
- use chat
- teleport players to certain locations.
Minecraft Education needs to be open on at least one device for Classroom Mode to work.
Classroom Mode for Minecraft is available to all schools under the department’s Microsoft licence.
You do not need to use Classroom Mode with every Minecraft lesson. Use it when you have multiple students joining worlds to monitor students, support them through chat and control of the in-game settings.
Dynamic content, articles, case studies, resources... for example how to enhance learner agency using this tech), or how this could link to the curriculum] - more detail than a thumbnail (‘card’)
Step 1 – check the minimum requirements
Classroom Mode for Minecraft doesn’t have special requirements. It:
- is available for Windows and Mac
- uses single sign-on (schools email address)
- only needs to be installed on staff devices.
Step 2 – Ask your site leader to complete or review the cyber risk assessment
Minecraft Education has been endorsed as a whole of department enterprise solution available to all sites.
Before you start using this software, your site leader must have reviewed and accepted the cyber security risk assessment – Minecraft Education and approved it for use. It includes recommended strategies on how to mitigate risks.
Step 3 – consider procurement requirements
Classroom Mode for Minecraft is free for all schools and preschools as part of the department’s enterprise agreement with Microsoft (Microsoft Education A3 licence).
Step 4 – Talk to your site tech about how to install the software
Contact your school IT to organise the installation of Classroom Mode for Education on all devices of teachers and support staff who will use it. You can supervise more than one Minecraft world at a time with one teacher device.
If you have admin permission to install the software yourself you can install Classroom Mode on your device.
Use central deployment where possible
Step 5 – Log in
Staff can access Classroom Mode for Minecraft by logging in with their @schools email and password – Okta single sign-on may sign you in. (If working from outside the school network, you may need additional authentication as for all other Microsoft applications.)
Step 6 – Open Minecraft Education and enter your connection code
You can open Minecraft Education on your own machine or oversee worlds hosted by students with Classroom Mode for Minecraft.
First time user
Familiarise yourself with the interface and basic slash commands: find a list of essential slash commands on the Minecraft Education support site.
Using Classroom Mode for Minecraft with a world you’re hosting
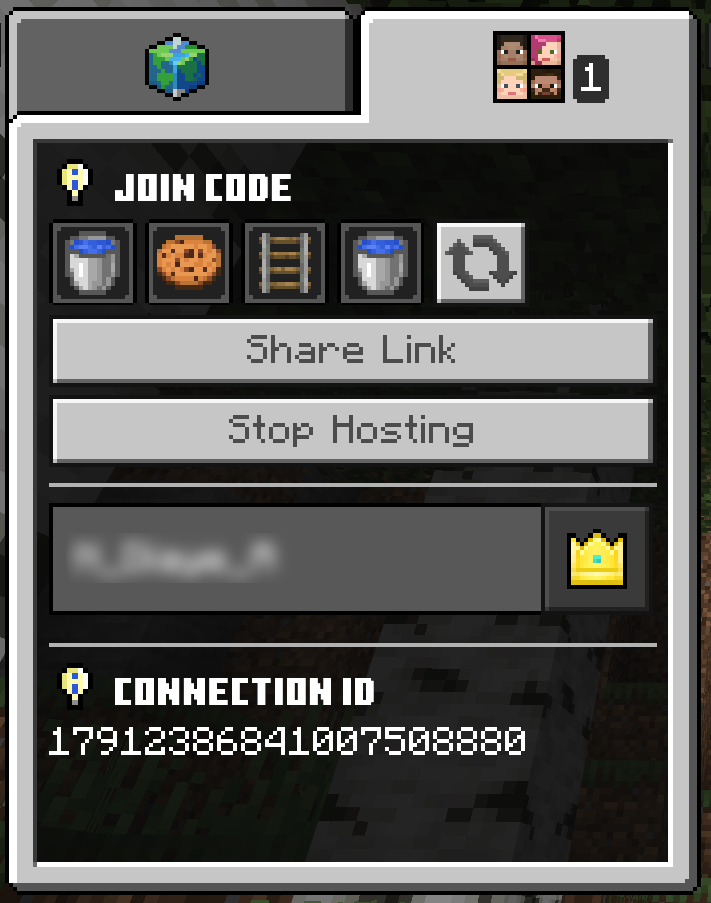
- Open Classroom Mode for Education and copy the connection code to your clipboard.

- Open a world in Minecraft Education and select the host option (‘create new’).
- Press ‘t’ to open the chat in your world.
- Paste the connection code into the chat.
- Still in Minecraft Education, press ‘escape’ (esc) and select the sharing tab to see the join code.
- Distribute the 4-picture code to allow students to join your world.
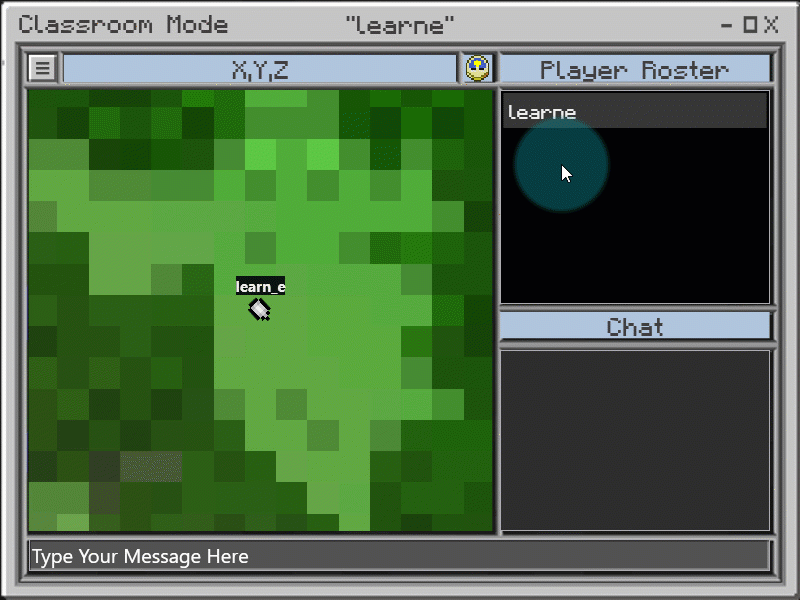
Using Classroom Mode for Minecraft to monitor student-hosted worlds
For each world you need to monitor you need a separate instance of Classroom Mode open. You can open multiple instances of Classroom Mode via the start menu. This is useful when students are working in small groups to complete a task.
- Open Classroom Mode and copy the connection code to your clipboard.
- Distribute one connection code to each student hosting a Minecraft world. This might be via your LMS or you could project it on a screen for students to see.
- Each student hosting a world will need to let the members of their group know the code for their world.
- You‘ll see a map of each world and a list of the students in each instant of Classroom Mode you have open.
Built-in resources, online tutorials and self-help
These 2 video tutorials can help you connect and use Classroom Mode for Minecraft with your students:
In-house training by the department
For support from the department join the Minecraft Education support team (on Microsoft Teams).
Other technology you can use with this tech
Link to Minecraft articleSupport resources
Get Started with Classroom Mode – Minecraft Education
Cyber risk assessment
Place holder for nested content
Student safety and wellbeing
The nature of this space necessitates specific safety considerations. Here are key guidelines to protect your students and foster a positive learning environment in this digital space:
- Monitor online interactions – make sure to supervise multiplayer mode, especially if students are interacting on shared servers. Make sure students are aware of behaviour expectations.
- If you need to access the chat logs after a session has ended, they’re saved locally on your device: Documents\Minecraft Education Edition\ChatLogs.
Teleporting students: Use the map to teleport all students or individual players.
To teleport all players:
- Right click on the map.
- Select Teleport all here.

To teleport individual players:
- Select the player’s name in the Player roster panel.
- Drag the player’s name to the location on the map.
Using Slash commands: If you’re familiar with slash commands you can use these in the chat. Use the commands with ‘@’ and the players name from the player roster to interact with individual players.
Leave a review
Have you used Minecraft Education with your students?
You can leave a review on edSpark or give a testimonial (link to feedback form)